Lab 1
Lab 2
Lab 3
Lab 4
Lab 5
Lab 6
Lab 7
Lab 8
Lab 9
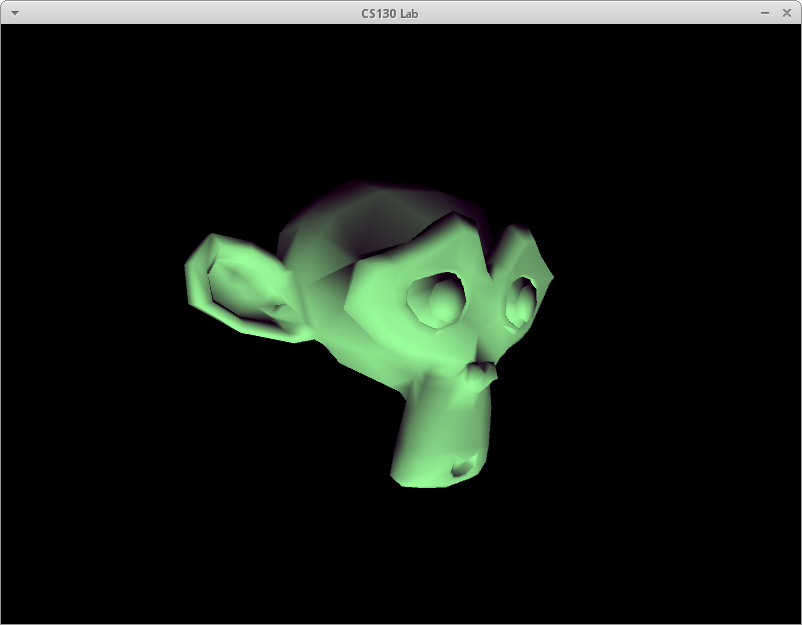
Lab 1 : Introduction to OpenGL
Overview
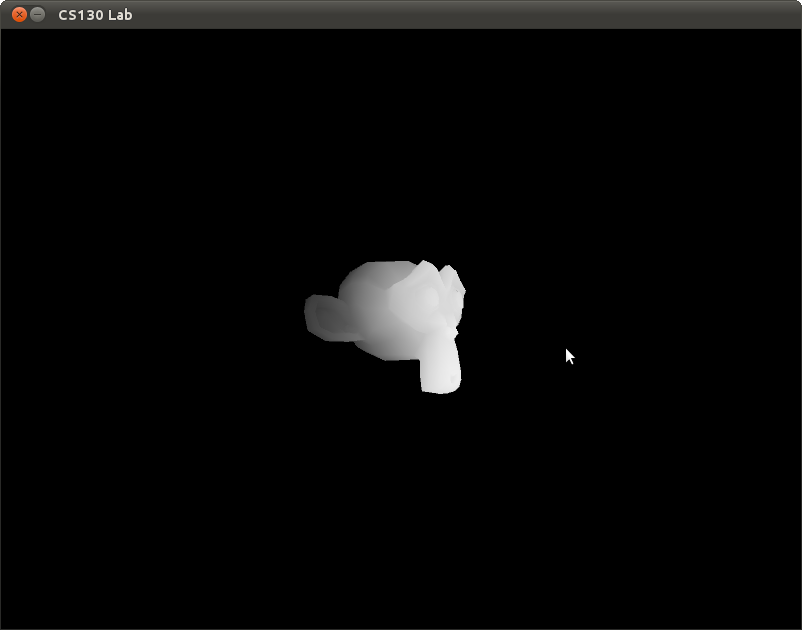
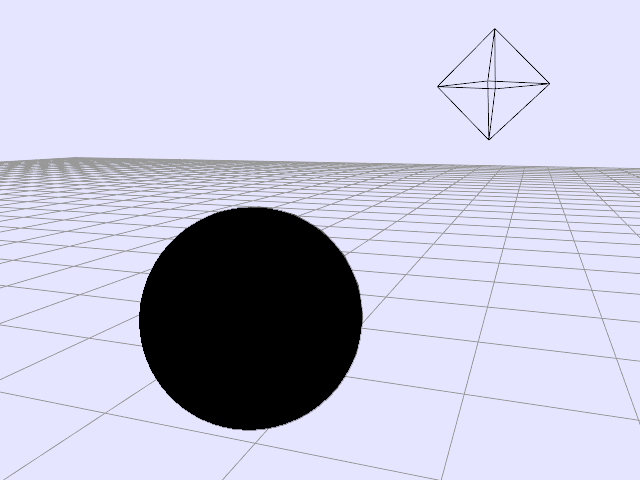
In this assignment, you will be introduced to a OpenGL and the 3D rendering pipeline. You are required to do the following.
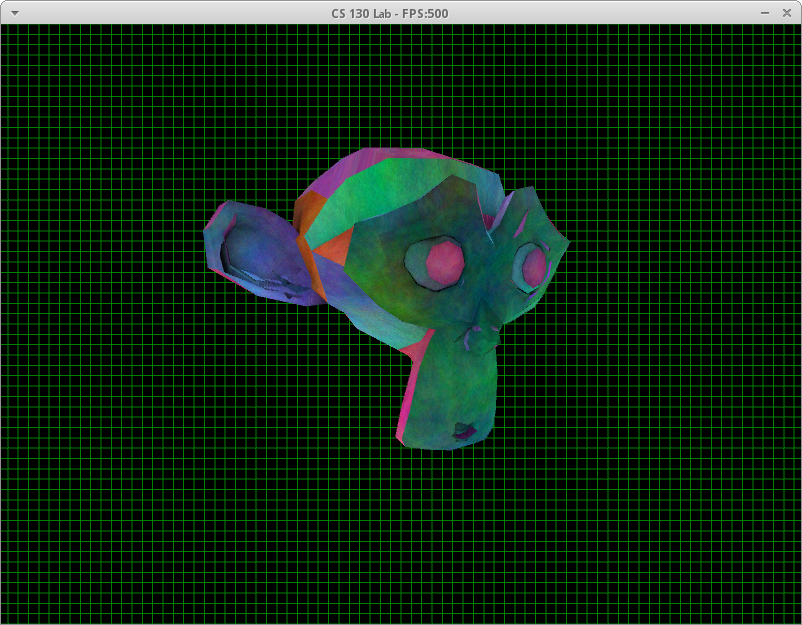
1. Load a monkey head into your program.
2. Render it using OpenGL. (Be sure to color it in such a way that its features are visible)
What's happening
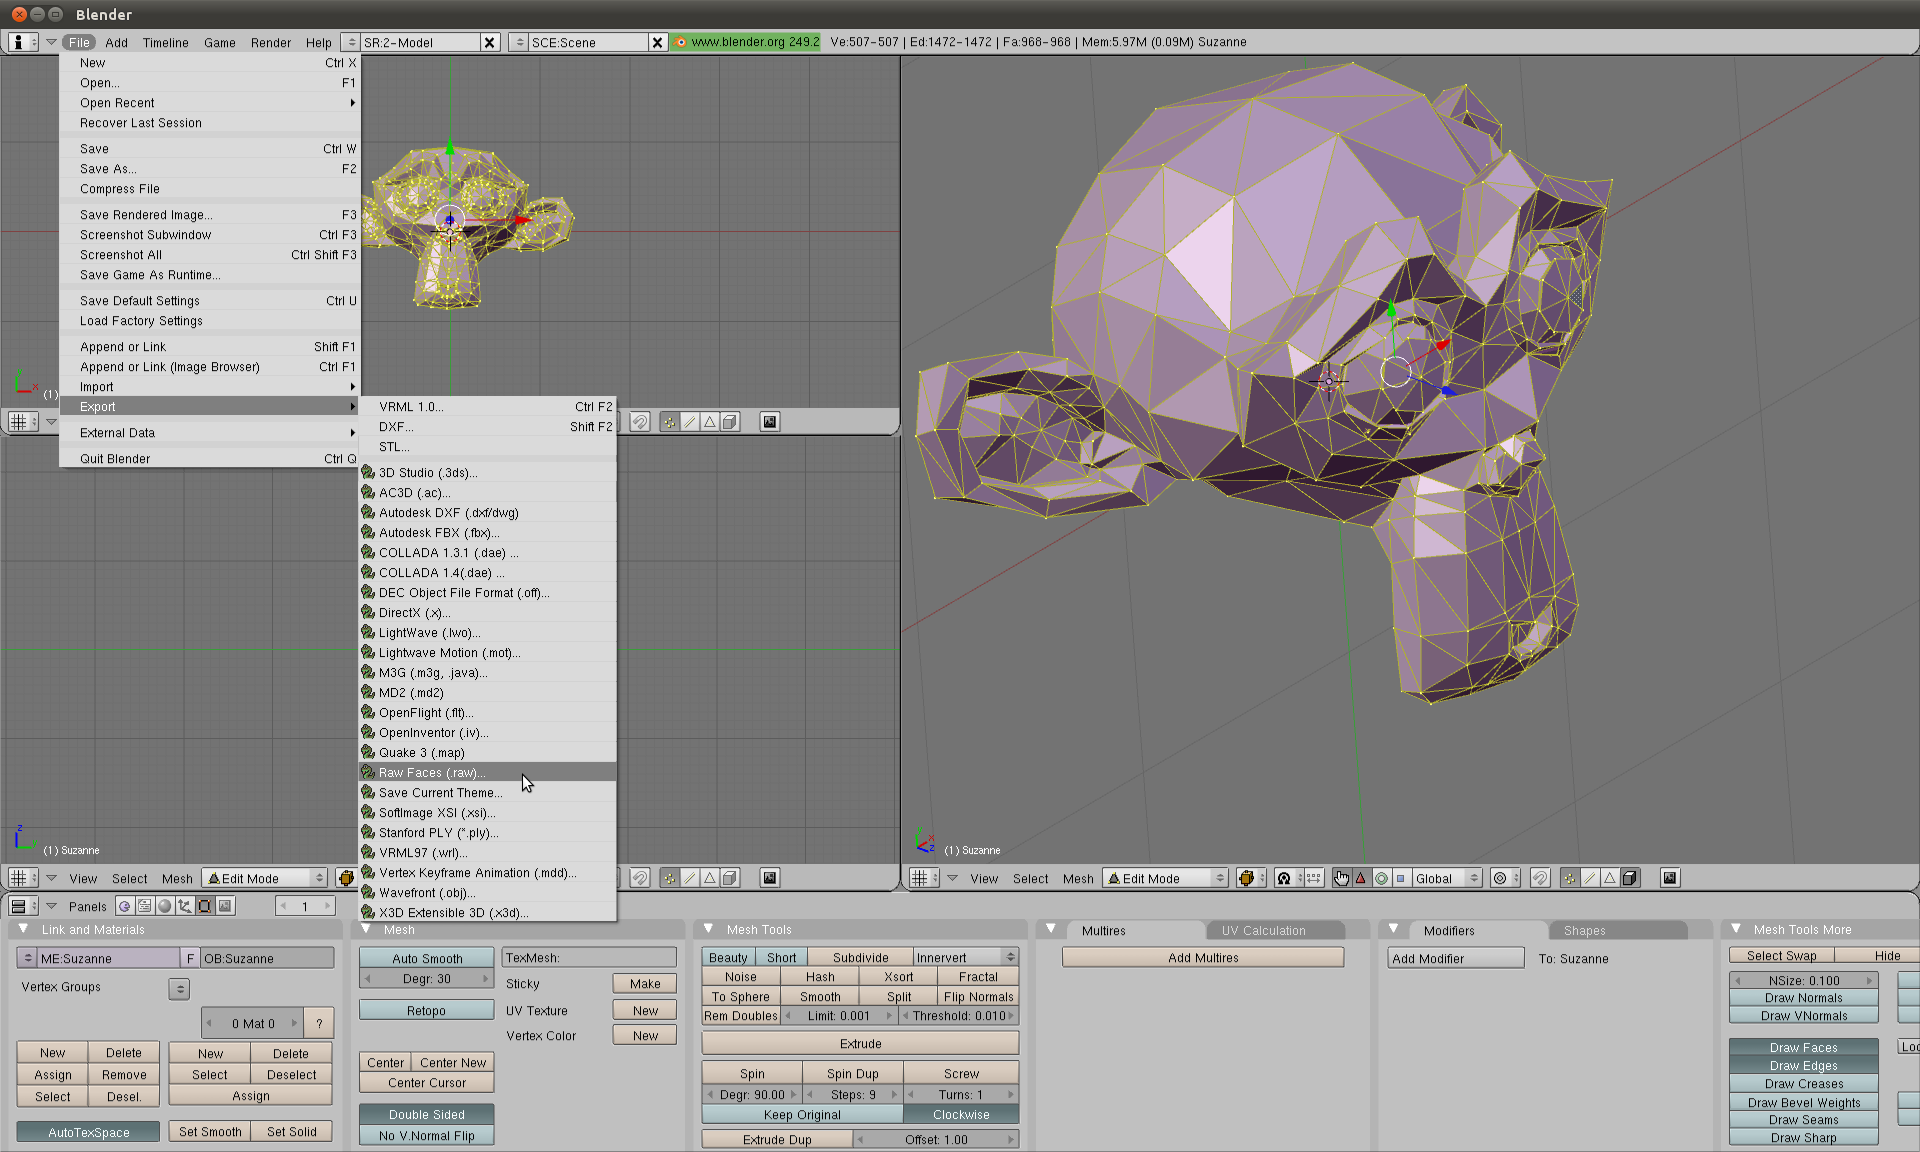
We start out in a modelling program. Say Maya, 3D Studio Max, or my personal favorite Blender.
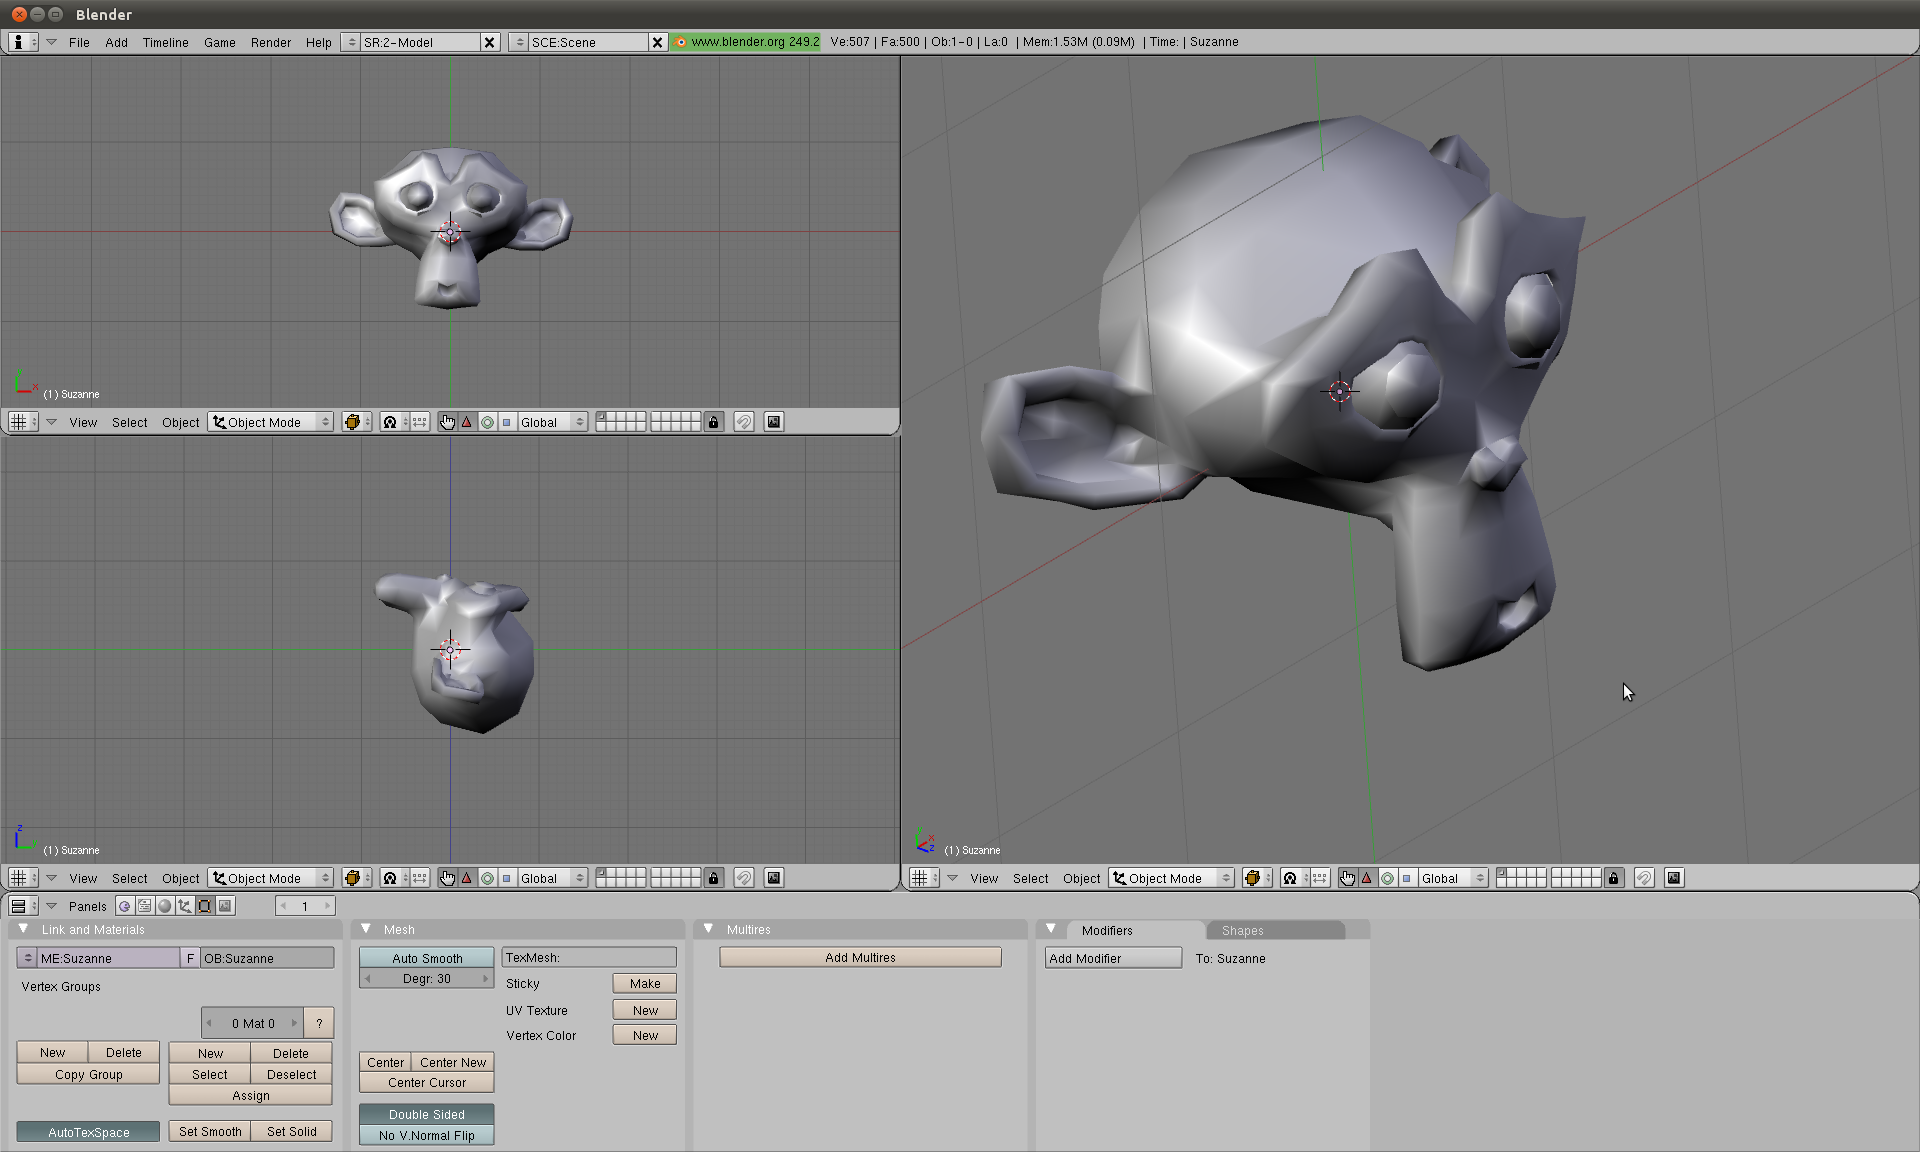
We model something say this monkey head. Keep in mind that this head consists of nothing but polygons or more specifically triangles.
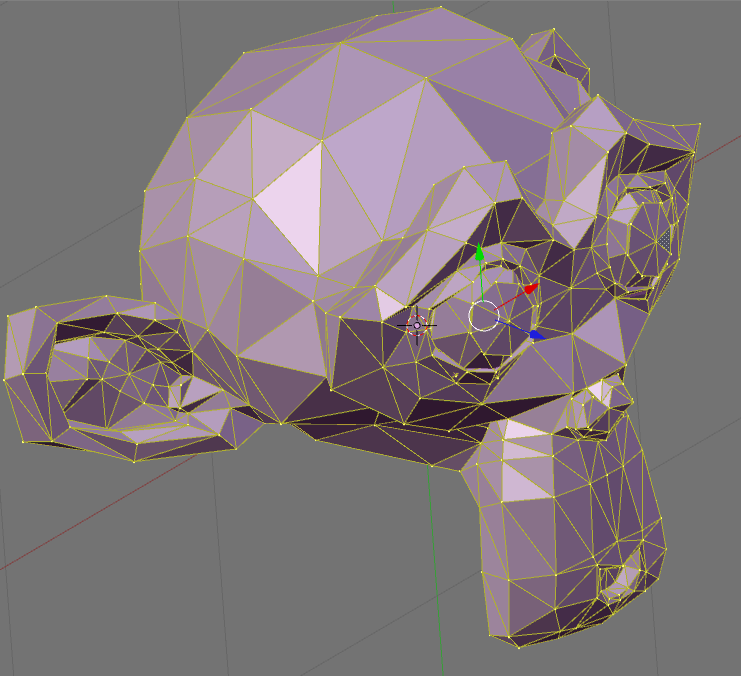
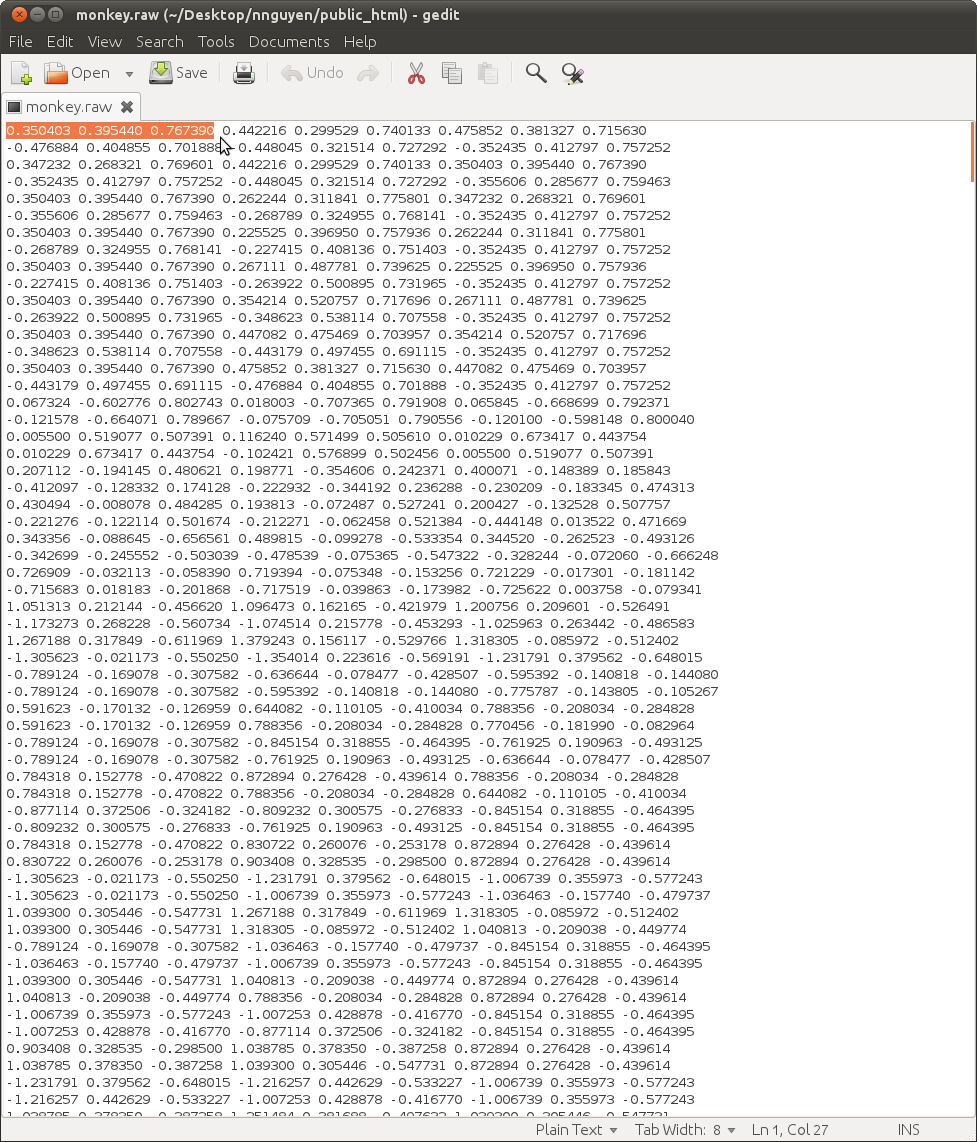
We export it(I actually use ctrl-T to triangulate it first). In this example I'm using the RAW file format mostly because its so simple. Each line consists of 9 numbers representing a triangle.
Every 3 numbers form the x-y-z coordinate of a vertex. Together 3 vertices form a triangle. So our monkey.raw is nothing more than a list of triangles. There are of course more complicated file formats which can store color, texture, normal information, per vertex or are structured in better ways. But we will use this for its simplicity.
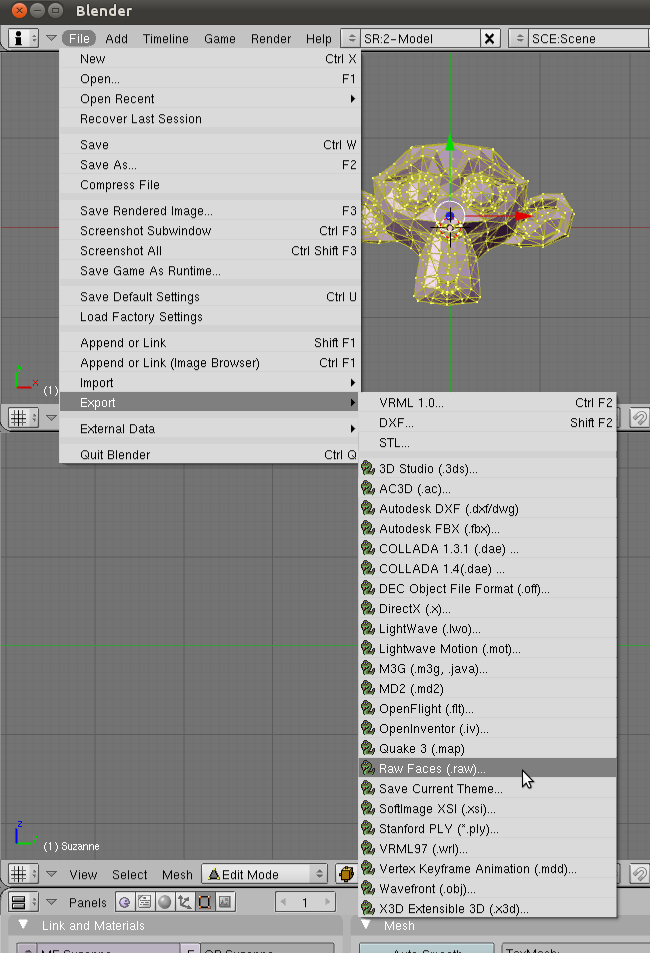
We then load the file into our program(CS12 stuff) and then use some OpenGL calls to send those vertices down the graphics pipeline.
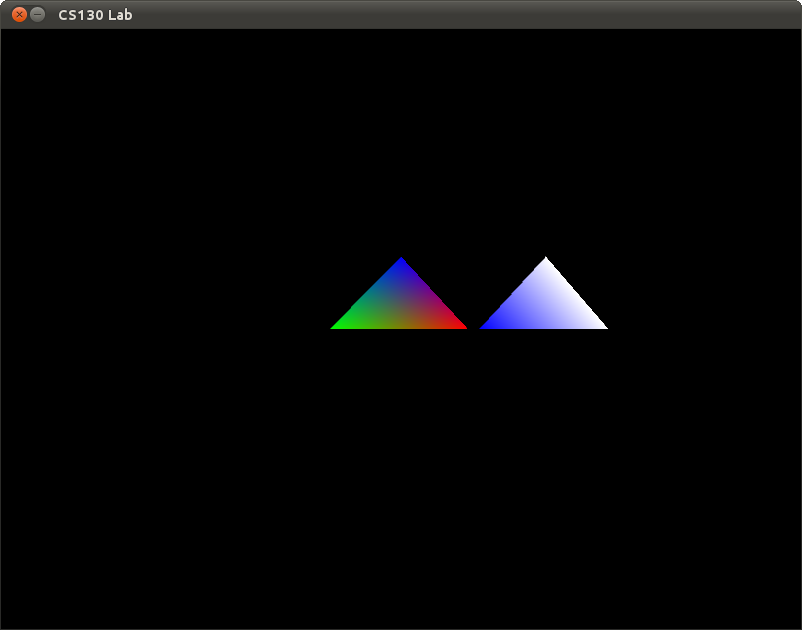
And we end up with the following.
Triangles
The only thing we need to worry about right now is how to send triangles down the pipeline.
Which is as simple as specifiying the coordinates for the triangle
glBegin(GL_TRIANGLES); //tell OpenGL we'll be sending it a bunch of vertices
glVertex3f(-1,0,0);
glVertex3f(1,0,0);
glVertex3f(0,1,0);
glEnd(); //tell OpenGL we are done
likewise we can also specify a color per vertex. This is specifying a specific vertex attribute.
There are others such as glTexCoord2f() for texturing or glNormal3f() for normal information for lighting.
glBegin(GL_TRIANGLES); //tell OpenGL we'll be sending it a bunch of vertices
glColor3f(0,0,0); //rgb color value
glVertex3f(-1,0,0);
glColor3f(0,0,1); //rgb color value
glVertex3f(1,0,0);
glColor3f(1,1,1); //rgb color value
glVertex3f(0,1,0);
glEnd(); //tell OpenGL we are done
And of course we are only showing you the easiest(and depreciated) way to pass vertex data into OpenGL.
There are of course faster ways that don't involve an entire function call per vertex you are passing in:
http://www.opengl.org/wiki/Vertex_Arrays
With vertex arrays you are essentially passing in pointers to your data instead of using an entire function call per vertex.
You also pass in the stride.. which tells OpenGL how many bytes to jump to get to the next part of the data. I'll lecture more on this
if you're curious.
Also there are ways which involve storing the data inside the graphics card for future use. So you don't have to stream in the
data from the client each time you want to draw something.
http://www.opengl.org/wiki/Vertex_Buffer_Object
Code
Sample code is given here.
Note: I stripped away all of the structure for the code to make it easier to parse. Later on in the course you will be given better organized code but for now I'm going to err on the side of simplicity.
Submission Instructions
Please save your labs you will later be asked to submit them on ilearn when the site is up. I will check off the labs when you are done.
If you need more time they are due by the beginning of the next lab.
External Resources
The following resources should prove to be useful for this
and future labs.
OpenGL 2.1 reference
OpenGL
Programming Guide (Redbook)
OpenGL
Reference Guide (Bluebook)
Nehe OpenGL Tutorials
Lab 2 : Line Rasterization
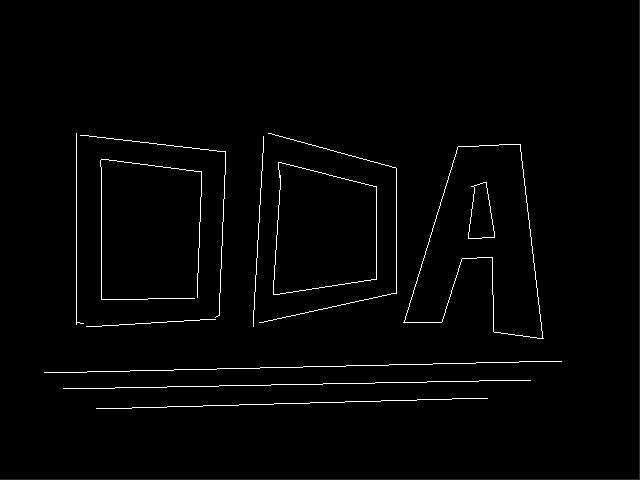
Description
This lab will introduce you the basic problem of rasterization. For this lab you will implement the DDA (Digital Differential Analyzer) line rasterization algorithm in OpenGL. Your implementation should be able to draw multiple lines of any slope without breaks.
Code
You may download the starter code from here.
External Resources
DDA Wiki entry
Lab 3 : Transformations
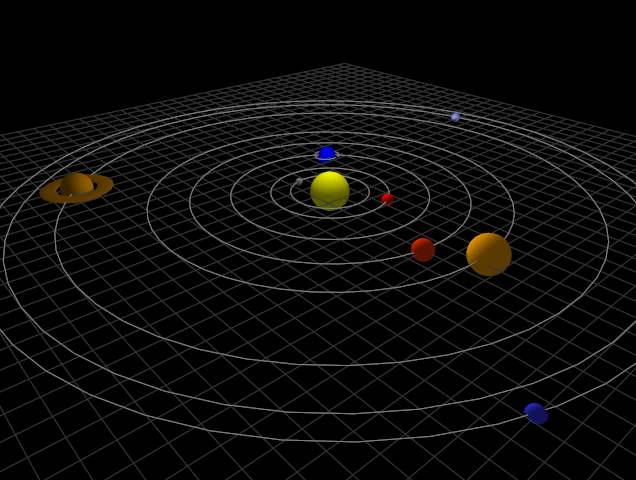
Description
This lab will introduce you to transformation hierarchies
with OpenGL.
For this lab assignment you will be required to create and
animate an object by transforming a set of basic geometric
primitives. You will learn how to combine transformations to
position and orient objects in 3D space, as well as how to
make those objects move. After completing the lab, you should
understand what a transformation hierarchy is.
You will be allowed to choose the type of object you wish to
model and animate; however, they must be subject to the
following restrictions:
- You must use glTranslatef, glRotatef, glScalef,
glPushMatrix and glPopMatrix at least once.
- Your object must have a transformation hierarchy at
least 2 levels deep. In other words, your object must be
composed of subobjects thats transform relative to each
other in some hierarchical manner. e.g. A vehicle with wheels that
rotate relative to the chassis of the vehicle, or a moon
that rotates about a planet.
- Your object must animate. You should use
the realtime timer provided in timer.h to synchronize
your motion with real-world time; otherwise, your
animation will run as fast as the machine can render.
Here are some examples of interesting objects which meet the
requirements:
- The planets and moons of our solar system.
You will not need to animate all moons (1 is
sufficient).
- A car or other similar vehicle that
moves around the screen. You can bind the
movement to the keyboard.
- A movable, articulated robot arm.
Code
As with prior labs, you will need to download
starter code OpenGL 3D viewer code. This code will provide you with a functional
3D OpenGL viewer as well as a realtime timer that you will need.
Submission Instructions
I will check off the labs when you are done. Submit your labs on ilearn when you are done.
External Resources
OpenGL Viewing
OpenGL Transformation
Lab 4 : Introduction to 3D Modeling
Description
In this lab you will be making a 3D model in Blender. Save a screenshot when you are done. You may use the remainder of your time to study for the exam on Friday.
Submission Instructions
I will check off the labs when you are done. Submit your labs on ilearn when you are done. I just need a screenshot of your work.
External Resources
Blender wikibook
Lab 5 : Programmable Shading
Description
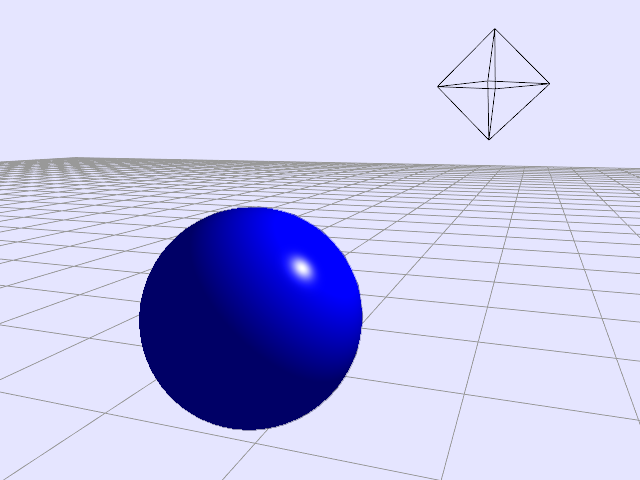
In this lab you will learn about shading through the use of programmable shaders. You are required
to set up the shaders and then perform diffuse shading on the monkey head. When you are done, I highly
recommend you play with the shaders a bit to get a feel for them and what they can do. Play with them
to better understand the graphics pipeline. I highly recommend going through the Lighthouse 3D tutorials
as you are doing the lab.
Code
Sample code is available here.
Submission Instructions
I will check off the labs when you are done. Submit a compressed folder to ilearn, when you are done
External Resources
Lighthouse 3D tutorial
OpenGL Shading Language
OpenGL 2.1 Reference Pages
string vertexFile = getTextFile(vertexfilename);
string fragmentFile = getTextFile(fragmentfilename);
GLuint vertexShader = glCreateShader(GL_VERTEX_SHADER);
char* c = &vertexFile[0];
glShaderSource(vertexShader, 1, (const GLchar**)&c, NULL);
glCompileShader(vertexShader);
GLuint fragmentShader = glCreateShader(GL_FRAGMENT_SHADER);
c = &fragmentFile[0];
glShaderSource(fragmentShader, 1, (const GLchar**)&c, NULL);
glCompileShader(fragmentShader);
GLuint shaderProgram = glCreateProgram();
glAttachShader(shaderProgram, vertexShader);
glAttachShader(shaderProgram, fragmentShader);
glLinkProgram(shaderProgram);
debugShader(vertexShader, fragmentShader, shaderProgram);
return shaderProgram;
Lab 6 : Texture Mapping
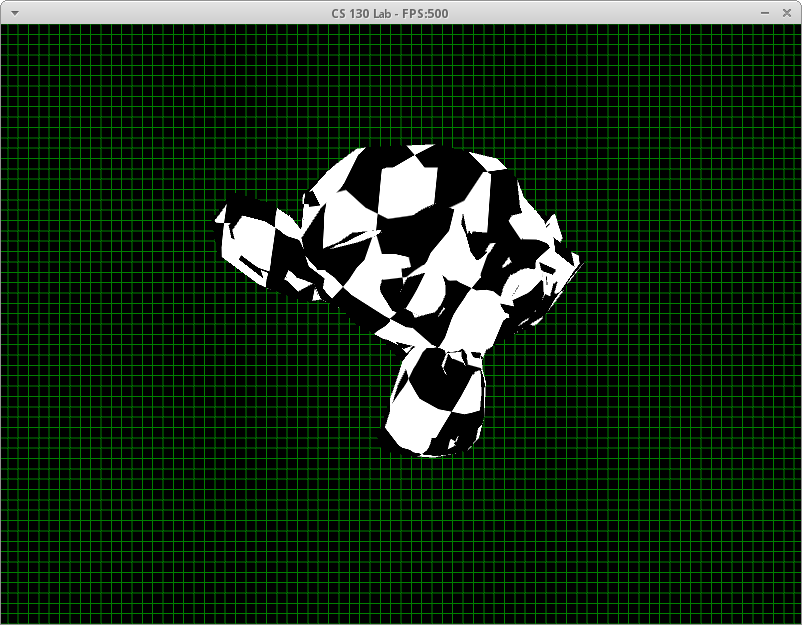
Description
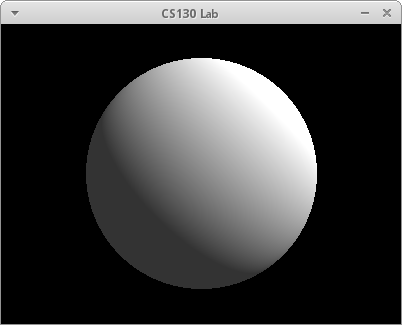
In this lab you will learn about texture mapping. You are required to map a texture onto a model. In addition, you are required to add specular lighting to your model. Feel free to use any resources online as long as you understand what it is doing. When you are done, I highly recommend you play with the textures a bit to get a feel for them and what they can do. Since the assignment 1 is due this week you may also spend the rest of lab time working on it.
Code
Sample code is available here.
Submission Instructions
I will check off the labs when you are done. Submit a compressed folder to ilearn, when you are done
External Resources
team fortress 2 illustrative rendering
Gamedev texture mapping tutorial
OpenGL FAQ
OpenGL 2.1 Reference Pages
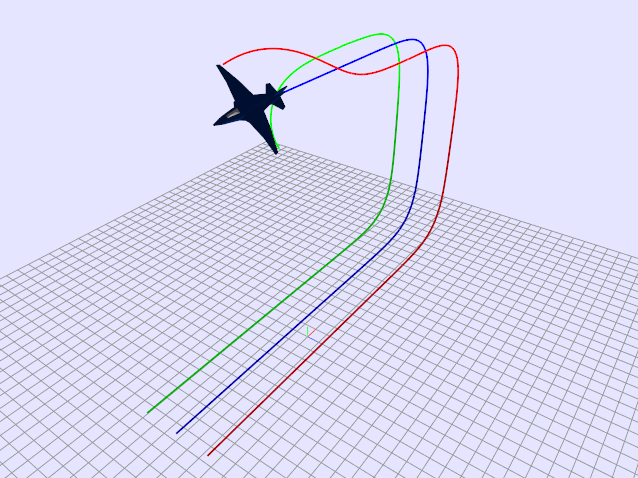
Lab 7 : SLERP
Description
This lab will introduce you to the usefulness of quaternions
as a 3D-rotation representation. Today you will be exploring
quaternions most useful feature, the ability to smoothly
interpolate without ugly singularities. As with previous
labs, you will need to download starter code. This code will provide you
with a basic quaternion class to help you get started.
You will be required to implement the SLERP (spherical
linear interpolation) function discussed in lab. Once you
have implemented SLERP you should specify two rotations
(must not be along the same rotation axis) in angle-axis
format, convert them to quaternions, and then perform Slerp
for varying values of u (iterate across the interpolation
parameter, u, from 0 to 1 in fixed step sizes). You will
then take the provided plane model and draw it multiple
times using rotations you sampled from the SLERP function. You
should end up with an rendering that is similar to the image above.
Bonus:
Make the plane fly! Interpolate
the rotation of the plane in time using the real-time timer.
Let each draw cycle update the
position of the plane (assume a constant velocity) based
upon the current forward facing direction. You can use the
forward Euler numerical integration rule, x_{t+h} = x_{t} +
h*v_{t}, (where x, v, and h are the position, velocity, and
step size), to update the position of the plane each draw cycle.
External Resources
Why you shouldn't be doing this lab
Slerp Article on Wikipedia
Animating Rotation with Quaternion Curves
Read the SLERP section for alternative way of doing SLERP
Lab 8 : Introduction to Raytracing
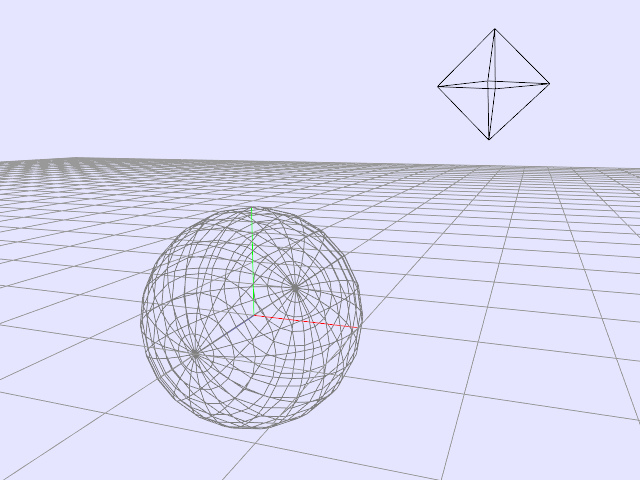
Description
This lab is to help you get started with your second assignment which is on raytracing. The main difference between this lab and your second assignment is that in the second assignment you'll be working with a lot of skeleton code. To compensate, this lab will give you very little skeleton code and require you to implement much of the raytracing from scratch.
Code
SAMPLE CODE HERE
Submission Instructions
When you are done submit both this lab and lab 7 to ilearn
External Resources
Ray sphere intersection
Ray sphere intersection 2
Lab 9 : Particle Systems
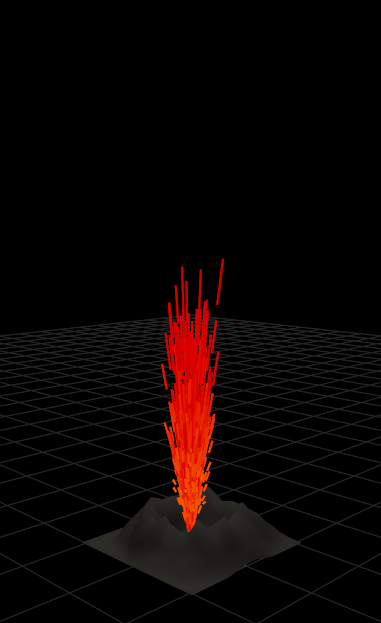
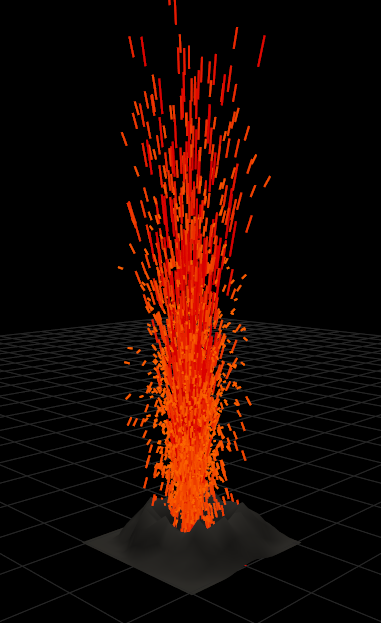
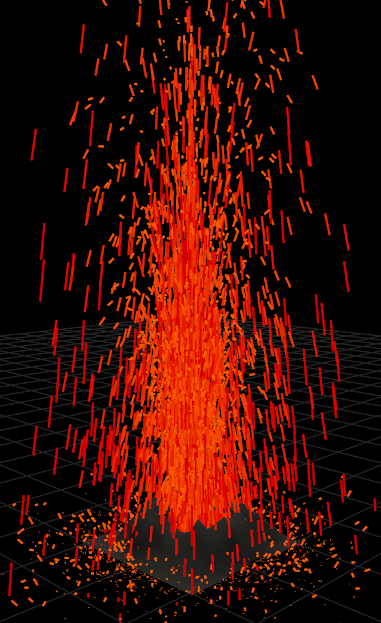
Description
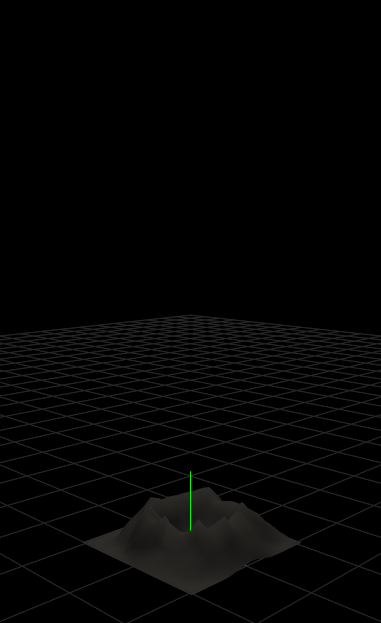
Particle simulation is used quite often in computer graphics
to generate the motion. Today you will be simulating mass
particles to generate an animation for lava. In contrast to
previous labs, the animations you generate today will be
created almost automatically through integration of Newton's
Second Law of Motion, f=ma. This lab will demonstrate the power of
particle simulation for animating complex phenomenon.
You should implement the particle system discussed in the
provided PDF. You will need to implement the following
components:
- The particle struct containing all the necessary
information
- The Euler integrator
- Ground contact and friction
- The material of the particles
It should appear similar to the image below. Make sure you
introduce some randomness into the initial velocity of
particle, otherwise your lava will look eerily uniform and
un-compelling. Your crater should also emit particles
indefinitely.
Optional
Make the lava more realistic by introducing other
sources of force. Some examples are:
- Explosive forces at the base to make the lava more
volatile and unpredictable
- Wind vortices
- Viscous forces between neighboring particles
Code
Download the starter code here
and the accompanying document
here.
Submission Instructions
The assignment is due at the latest Wednesday, to be demonstrated at my office hours for credit.