Now we will see the installation procedure of Ns2. Download the
Network Simulator Ns2
to your local drive and copy it to the location:
/class/cs164/cs164_09win/your_user_name/. Untar it and
then go inside the ns-allinone-2.31 folder and type
./install, in order to begin installation of ns2.
After the installation of Ns2 has finished you will see in your terminal
that you have to make some corrections, in order the simulator to work.
The message that you will see will be like the following:
| Please put: /class/cs164/cs164_09win/jning/ns-allinone-2.31/bin:/class/cs164/cs164_09win/jning/ns-allinone-2.31/tcl8.4.14/unix:/class/cs164/ cs164_09win/jning/ns-allinone-2.31/tk8.4.14/unix into your PATH environment; so that you'll be able to run itm/tclsh/wish/xgraph. IMPORTANT NOTICES: (1) You MUST put /class/cs164/cs164_09win/jning/ns-allinone-2.31/otcl- 1.13, /class/cs164/cs164_09win/jning/ns-allinone-2.31/lib, into your LD_LIBRARY_PATH environment variable. If it complains about X libraries, add path to your X libraries into LD_LIBRARY_PATH. If you are using csh, you can set it like: setenv LD_LIBRARY_PATH <paths> If you are using sh, you can set it like: export LD_LIBRARY_PATH=<paths> (2) You MUST put /class/cs164/cs164_09win/jning/ns-allinone-2.31/tcl8. 4.14/library into your TCL_LIBRARY environmental variable. Otherwise ns/nam will complain during startup. (3) [OPTIONAL] To save disk space, you can now delete directories tcl8.4.14 and tk8.4.14. They are now installed under /class/cs164/cs164_09win/j ning/ns-allinone-2.31/{bin,include,lib} After these steps, you can now run the ns validation suite with cd ns-2.31; ./validate For trouble shooting, please first read ns problems page http://www.isi.edu/nsnam/ns/ns-problems.html. Also search the ns mailing list ar chive for related posts. |
In the above lines, replace jning with your
username. That's all that you have to change in the .bashrc file.
Note:In the terminal do NOT run the command ./validate because
it takes a long time to run .... Additional resources and information you
can find in the Official
Site of Ns2.
This section shows a simple NS simulation script and explains what each line does. Example 1 is an OTcl script that creates the simple network configuration and runs the simulation scenario in Figure 1. To run this simulation, download "ns-simple.tcl" and type "ns ns-simple.tcl" at your shell prompt.
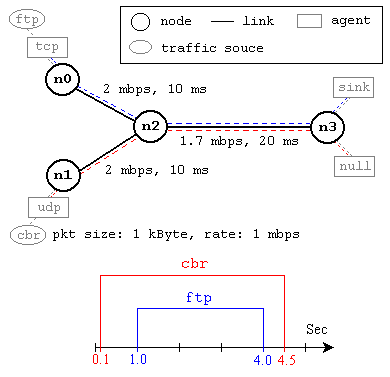
Figure 1. A Simple Network Topology and Simulation Scenario
This network consists of 4 nodes (n0, n1, n2, n3) as shown in above figure. The duplex links between n0 and n2, and n1 and n2 have 2 Mbps of bandwidth and 10 ms of delay. The duplex link between n2 and n3 has 1.7 Mbps of bandwidth and 20 ms of delay. Each node uses a DropTail queue, of which the maximum size is 10. A "tcp" agent is attached to n0, and a connection is established to a tcp "sink" agent attached to n3. As default, the maximum size of a packet that a "tcp" agent can generate is 1KByte. A tcp "sink" agent generates and sends ACK packets to the sender (tcp agent) and frees the received packets. A "udp" agent that is attached to n1 is connected to a "null" agent attached to n3. A "null" agent just frees the packets received. A "ftp" and a "cbr" traffic generator are attached to "tcp" and "udp" agents respectively, and the "cbr" is configured to generate 1 KByte packets at the rate of 1 Mbps. The "cbr" is set to start at 0.1 sec and stop at 4.5 sec, and "ftp" is set to start at 1.0 sec and stop at 4.0 sec.
| #Create a simulator object set ns [new Simulator] #Define different colors for data flows (for NAM) $ns color 1 Blue $ns color 2 Red #Open the NAM trace file set nf [open out.nam w] $ns namtrace-all $nf #Define a 'finish' procedure proc finish {} { global ns nf $ns flush-trace #Close the NAM trace file close $nf #Execute NAM on the trace file exec nam out.nam & exit 0 } #Create four nodes set n0 [$ns node] set n1 [$ns node] set n2 [$ns node] set n3 [$ns node] #Create links between the nodes $ns duplex-link $n0 $n2 2Mb 10ms DropTail $ns duplex-link $n1 $n2 2Mb 10ms DropTail $ns duplex-link $n2 $n3 1.7Mb 20ms DropTail #Set Queue Size of link (n2-n3) to 10 $ns queue-limit $n2 $n3 10 #Give node position (for NAM) $ns duplex-link-op $n0 $n2 orient right-down $ns duplex-link-op $n1 $n2 orient right-up $ns duplex-link-op $n2 $n3 orient right #Monitor the queue for link (n2-n3). (for NAM) $ns duplex-link-op $n2 $n3 queuePos 0.5 #Setup a TCP connection set tcp [new Agent/TCP] $tcp set class_ 2 $ns attach-agent $n0 $tcp set sink [new Agent/TCPSink] $ns attach-agent $n3 $sink $ns connect $tcp $sink $tcp set fid_ 1 #Setup a FTP over TCP connection set ftp [new Application/FTP] $ftp attach-agent $tcp $ftp set type_ FTP #Setup a UDP connection set udp [new Agent/UDP] $ns attach-agent $n1 $udp set null [new Agent/Null] $ns attach-agent $n3 $null $ns connect $udp $null $udp set fid_ 2 #Setup a CBR over UDP connection set cbr [new Application/Traffic/CBR] $cbr attach-agent $udp $cbr set type_ CBR $cbr set packet_size_ 1000 $cbr set rate_ 1mb $cbr set random_ false #Schedule events for the CBR and FTP agents $ns at 0.1 "$cbr start" $ns at 1.0 "$ftp start" $ns at 4.0 "$ftp stop" $ns at 4.5 "$cbr stop" #Detach tcp and sink agents (not really necessary) $ns at 4.5 "$ns detach-agent $n0 $tcp ; $ns detach-agent $n3 $sink" #Call the finish procedure after 5 seconds of simulation time $ns at 5.0 "finish" #Print CBR packet size and interval puts "CBR packet size = [$cbr set packet_size_]" puts "CBR interval = [$cbr set interval_]" #Run the simulation $ns run |
Example 1. A Simple NS Simulation Script
The following is the explanation of the script above. In general, an NS script starts with making a Simulator object instance.
The "Simulator" object has member functions that do the following:
Most of member functions are for simulation setup (referred to as
plumbing functions) and scheduling, however some of them are for the
NAM display. The "Simulator" object member function implementations
are located in the "ns-2/tcl/lib/ns-lib.tcl"
file.
Now that the basic network setup is done, the next thing to do is to setup traffic agents such as TCP and UDP, traffic sources such as FTP and CBR, and attach them to nodes and agents respectively.
Assuming that all the network configuration is done, the next thing to do is write a simulation scenario (i.e. simulation scheduling). The Simulator object has many scheduling member functions. However, the one that is mostly used is the following:
After all network configuration, scheduling and post-simulation procedure specifications are done, the only thing left is to run the simulation. This is done by $ns run.
The above example and information come from the
Worcester Polytechnic Institute and
from the site Ns by Example. There
you can find many examples for Ns Simulator and additional resources.
Now that we saw a simple example of how Ns work, try to change the bandwidth of the links between the nodes and watch the drops of the packets in comparison with the bandwidth of the links.