UCR EE/CS120B: Digital Systems
Lab 8
Interfacing a Keypad and 7-segment to the 8051
Introduction
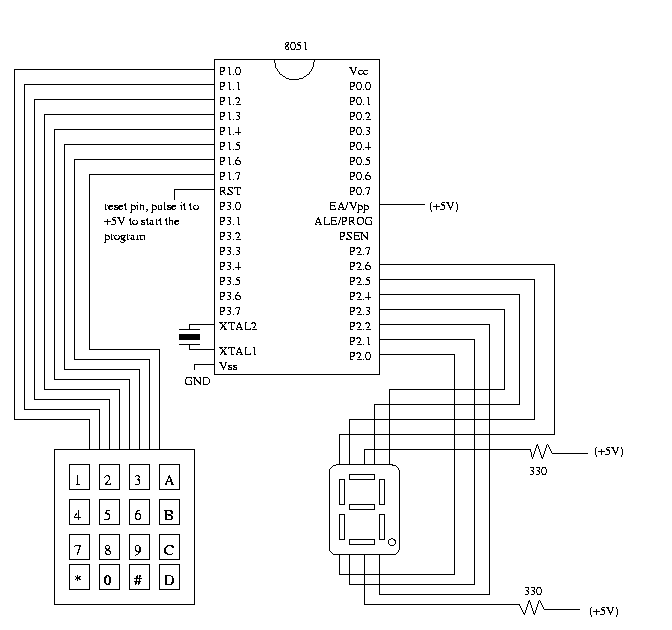
In this lab, you will be reading input from a keypad and display the corresponding button pressed unto a 7-segment display. You will be required to write a C program which will determine which key has been pressed on the key pad. The program will then display the corresponding character by configuring the output port correctly. The program will be compiled using the C51 compiler and burned onto an 8051 chip. A schematic is provided below to show connections needed to implement this lab.
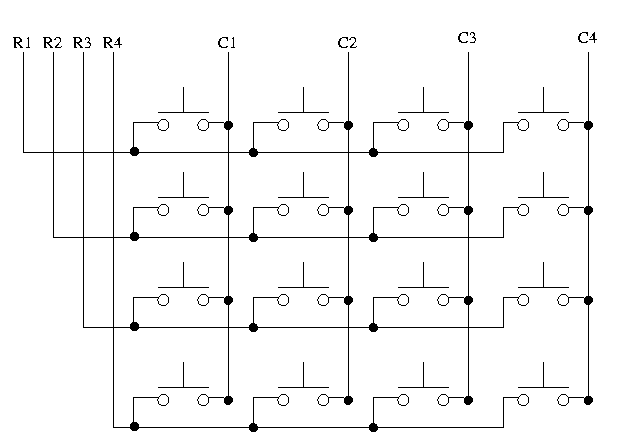
Keypads are often used as a primary input device for embedded microcontrollers. The keypads actually consist of a number of switches, connected in a row/column arrangement as shown in Fig 2.
In order for the microcontroller to scan the keypad, it outputs a nibble to force one (only one) of the columns low and then reads the rows to see if any buttons in that column have been pressed. The rows are pulled up by the internal weak pull-ups in the 8051 ports. Consequently, as long as no buttons are pressed, the microcontroller sees a logic high on each of the pins attached to the keypad rows. The nibble driven onto the columns always contains only a single 0. The only way the microcontroller can find a 0 on any row pin is for the keypad button to be pressed that connects the column set to 0 to a row. The controller knows which column is at a 0-level and which row reads 0, allowing it to determine which key is pressed. For the keypad, the pins from left to right are: R1, R2, R3, R4, C1, C2, C3, C4.
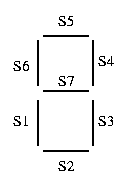
 7-segment display |
 Keypad connection |
Assignment
In this lab :
- You will read in input from the keypad
- If you read in a number or letter, display it on the 7-segment display. If you read in "*" or "#" then display error (light up s7).
Apparatus Required:
- 330 resistor (2)
- keypad
- 12MHz Crystal
- 5V power supply
- 7-segment display
Schematic:

Program:
/* main.c */

/* Read from a keypad and display the key pressed */
/* on an 7-segment display */

#pragma SMALL DB OE
#include <reg51.h>

unsigned char SetDisplay(unsigned char value){
    unsigned char LookupTable[17] = { 0xC0, ... };

    /* use code from previous lab */
    /* fill in entries to table to handle A, B, C, D, E, F */
}


/* Routine to scan the key pressed */
unsigned char key_scan()
{
       unsigned char i, j, temp1, temp2;

        while( 1 ) /* keep waiting for a key to be pressed */

                for(i=0; i<4; i++) { /* Set each row to 0 */ P1="0xff" & ~(1<<i); /* Scan each column to see which key was pressed */ for (j="4;" j<8; j++) { /* Code to determine the position of the key which was pressed */ /* return(position) */ } } } void main() { /* You can have a conversion table to convert the key position into a valid number or letter. The "*" and "#" symbols result in errors and map into postion 17 of the LookupTable */ unsigned char conv_table[]="{" 1, 2, 3, 10, 4, 5, 6, 11, 7, 8, 9, 12, 17, 0, 17, 13 }; char num; while(1) { /*read input from user */ /* display corresponding number */ } }
Procedure:
- Follow same procedure as previous lab to map your network drive, edit, compile your program.
- Complete the code provided. Burn unto a chip.
- Wire up the circuit as shown in the schematic.
- Test functionality of your circuit.